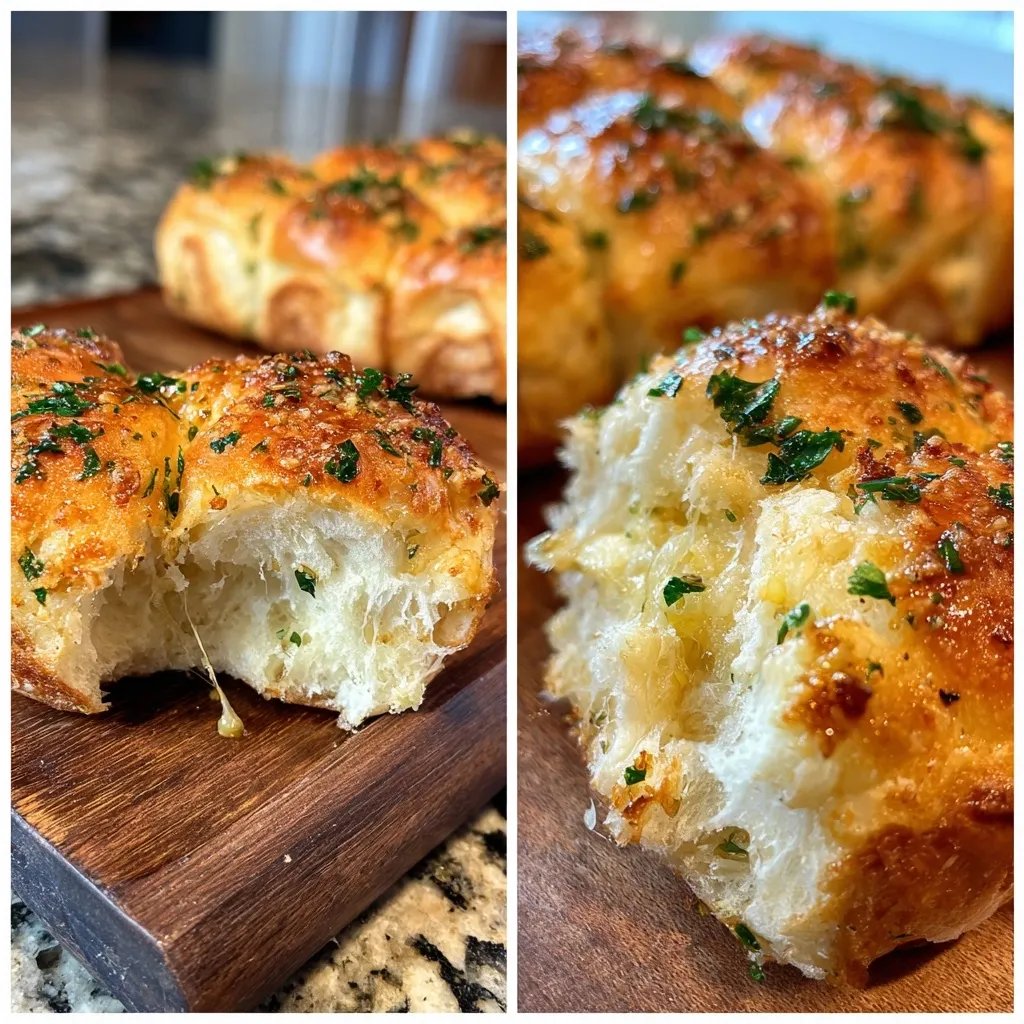
Pull Apart Garlic Rolls
Highlighted under: Gourmet Baking Bliss
I remember the first time I made these rolls for a family gathering, the aroma of garlic and butter filling up the house made everyone gather around the kitchen. It was a bit chaotic, with everyone trying to sneak a roll before dinner, and I knew I had to keep this recipe in my rotation. Soft, tender, and just the right amount of garlicky, they have a way of turning any meal into something special. Even my picky uncle couldn’t resist going back for seconds.
When I still lived at home, my mom used to whip up these garlic rolls for all our family dinners. I can still picture the way the kitchen would smell as they baked in the oven, and they're super easy to make, even in a rush.
I've adjusted the recipe over the years, sometimes adding fresh herbs or a sprinkle of cheese on top, just to change things up a bit. Honestly, they don’t last long once they're out of the oven, so prepare for everyone to go for seconds.
Why I Keep Making This
- They're a crowd-pleaser every time
- The garlic butter brings everything together
- You can make sure they bake perfectly golden
- They freeze well if you have leftovers
- Perfect for soaking up sauces at dinner
Getting the Texture Right for Pull Apart Garlic Rolls
Getting the dough just right is key to making these rolls fluffy and tender. When you knead it, aim for a smooth texture that feels slightly tacky but not overly sticky. You may need to adjust by adding a bit more flour if it feels too wet, but be careful not to add too much. Trust me, less is more with this dough. If you have a stand mixer, it's a real time-saver, but hand kneading works just as well; it gives you a good feel for the dough.
During the rising phase, pay attention to the kitchen temperature. If it’s too cool, the rolls might take longer to rise. On the other hand, if it's too warm, they may rise too fast and not develop the nice texture we’re looking for. A happy medium is around 75-80°F. Give them enough time to double in size; if you rush this step, they’ll end up denser than intended.
Ingredient Notes
Using Kerrygold butter is my little secret for adding rich flavor, but any unsalted butter will work. Just make sure it’s melted! As for the garlic, fresh is best, but I have used jarred minced garlic in a pinch when I didn’t have any fresh on hand, and it still came out pretty good. The parsley is optional but does add a lovely touch of color and freshness if you happen to have it lying around.
If you find yourself without instant yeast, it’s okay to use active dry yeast; just remember to let it bloom in the warm water for about 10 minutes first. If you want a hint of spice, sprinkle a little bit of paprika into the garlic butter mixture before coating the rolls. It's a small tweak that can add a nice touch without overpowering the garlic seasoning.
Ingredients
Gather these ingredients for the rolls, and don't forget the love you put into it!
Ingredients for Pull Apart Garlic Rolls
- 4 cups all-purpose flour
- 2 teaspoons instant yeast
- 1 cup warm water (110°F)
- 1/4 cup sugar
- 1 teaspoon Diamond Crystal kosher salt
- 1/4 cup Kerrygold butter, melted
- 4 tablespoons garlic, minced
- 2 tablespoons fresh parsley, chopped (optional)
- 1/2 teaspoon black pepper
Now that you've got everything, it's time to get your hands a little messy.
Instructions
Follow along step by step to make these rolls just right!
Make the Dough
In a large bowl, mix together the warm water, sugar, and yeast. Let it sit for about 5 minutes, until it becomes foamy. Then add the flour, melted butter, and salt to the bowl. Mix until it starts to come together, then knead for about 8-10 minutes until the dough is smooth and elastic. Don't skip this step; it makes all the difference!
Let it Rise
Place the kneaded dough in a lightly oiled bowl, cover it with a cloth or plastic wrap, and let it rise in a warm place for about 1 hour or until it has doubled in size. I usually turn on my oven for a minute to warm it up, then turn it off and let the dough rise inside.
Shape the Rolls
Once the dough has risen, punch it down gently. Divide the dough into about 12 equal pieces. Roll each piece into a ball and then dip it in a mixture of the minced garlic, melted butter, and black pepper. Place the rolls in a greased baking dish or cast iron skillet, then sprinkle with a little more garlic if you like!
Final Rise
Cover the shaped rolls with a cloth and let them rise again for about 30 minutes. This step is key to achieving those fluffy rolls, so don’t rush it. Preheat your oven to 350°F while you wait.
Bake Them
Once the rolls have puffed up, pop them in the oven and bake for about 25 minutes or until they're golden brown. You can brush a little extra melted butter on top right before they finish baking for that extra garlicky goodness. You'll know they’re done when they sound hollow when tapped on the bottom.
Serve and Enjoy
Let the rolls cool slightly before serving, but don’t wait too long! These rolls are best enjoyed warm. Slice them apart as needed and watch everyone enjoy. Honestly, if you have any leftovers, they make amazing sandwiches too!
Enjoy your freshly baked rolls!

What to Serve with Pull Apart Garlic Rolls
These garlic rolls are wonderful alongside a bowl of hearty soup or a fresh garden salad. They’re perfect for soaking up any leftover broth, and trust me, there will be leftovers because who can resist? If you're serving pasta, these rolls make great companions for the sauce—everyone will be happy when they can mop up the leftovers on their plates.
I also love to serve them with a cheese board. Just slice a roll in half, pile on your favorite cheeses, and you have an amazing little appetizer. And, if you have a little extra garlic butter left, dip the rolls in it right before serving. A little extra garlicky goodness never hurts!
Make-Ahead Tips
If you're planning a gathering, you can prepare the dough a day ahead. After kneading, let it rise for about an hour, then punch it down and put it in the fridge. The next day, let it come to room temperature before shaping the rolls. I sometimes do this when I want to avoid any last-minute chaos in the kitchen and that way, the rolls taste fresh out of the oven.
You can also freeze the shaped rolls after the second rise. Just cover them well with plastic wrap and store them in a freezer bag. When you're ready to bake, let them thaw in the fridge overnight and bake them as usual. I’ve done this plenty of times, and they still turn out fluffy and delicious—definitely a lifesaver when time is tight.
Questions About Recipes
→ Can I use all-purpose flour for this recipe?
Definitely, all-purpose flour works great for these rolls. If you want a bit more texture, you could try half all-purpose and half whole wheat.
→ What if I don't have instant yeast?
You can use active dry yeast, but you'll need to proof it in the warm water with a bit of sugar for about 5-10 minutes before adding it to the dough.
→ How do I store these rolls?
Store them in an airtight container at room temperature for up to 2 days. If you want to keep them longer, freeze them after baking, then reheat when you're ready to eat. Honestly, they taste even better that way sometimes!
→ Can I add cheese to the rolls?
For sure! Adding cheese is a great idea. Just sprinkle some shredded cheese on top of the rolls before they go into the oven for a cheesy twist.
Pull Apart Garlic Rolls
Created by: The Tastycrafter Team
Recipe Type: Gourmet Baking Bliss
Skill Level: Intermediate
Final Quantity: 12.0
What You'll Need
Ingredients for Pull Apart Garlic Rolls
- 4 cups all-purpose flour
- 2 teaspoons instant yeast
- 1 cup warm water (110°F)
- 1/4 cup sugar
- 1 teaspoon Diamond Crystal kosher salt
- 1/4 cup Kerrygold butter, melted
- 4 tablespoons garlic, minced
- 2 tablespoons fresh parsley, chopped (optional)
- 1/2 teaspoon black pepper
How-To Steps
In a large bowl, mix together the warm water, sugar, and yeast. Let it sit for about 5 minutes, until it becomes foamy. Then add the flour, melted butter, and salt to the bowl. Mix until it starts to come together, then knead for about 8-10 minutes until the dough is smooth and elastic. Don't skip this step; it makes all the difference!
Place the kneaded dough in a lightly oiled bowl, cover it with a cloth or plastic wrap, and let it rise in a warm place for about 1 hour or until it has doubled in size. I usually turn on my oven for a minute to warm it up, then turn it off and let the dough rise inside.
Once the dough has risen, punch it down gently. Divide the dough into about 12 equal pieces. Roll each piece into a ball and then dip it in a mixture of the minced garlic, melted butter, and black pepper. Place the rolls in a greased baking dish or cast iron skillet, then sprinkle with a little more garlic if you like!
Cover the shaped rolls with a cloth and let them rise again for about 30 minutes. This step is key to achieving those fluffy rolls, so don’t rush it. Preheat your oven to 350°F while you wait.
Once the rolls have puffed up, pop them in the oven and bake for about 25 minutes or until they're golden brown. You can brush a little extra melted butter on top right before they finish baking for that extra garlicky goodness. You'll know they’re done when they sound hollow when tapped on the bottom.
Let the rolls cool slightly before serving, but don’t wait too long! These rolls are best enjoyed warm. Slice them apart as needed and watch everyone enjoy. Honestly, if you have any leftovers, they make amazing sandwiches too!
Nutritional Breakdown (Per Serving)
- Calories (kcal): 220
- Total Fat (g): 7.5
- Saturated Fat (g): 4.5
- Cholesterol (mg): 20
- Sodium (mg): 250
- Total Carbohydrates (g): 34
- Dietary Fiber (g): 1.2
- Sugars (g): 1.8
- Protein (g): 5.5